You’ll hear this one at the marina bar more often than you’d think: “Just drain the water and kill the breaker — that’s all winterizing amounts to.” It’s fast advice, it sounds reasonable, and it lands you with $4,000 in repairs come April. Salt water finds its way into every space you leave unprotected. Corrosion doesn’t wait for spring; it starts the moment conditions turn damp and cold. I’ve pulled junction boxes open in March to find terminals half-eaten by oxidation after an owner took that shortcut seriously.
The real picture is messier and more specific. Winterizing your dock’s electrical and water systems means addressing corrosion prevention, verifying ground fault circuits, preparing for freeze cycles, and ensuring the whole setup aligns with ABYC E-11 before you walk away for the season. Skip any of these layers, and you’re gambling. I watched one property owner ignore this work through a single winter — the bill came to $4,200 when things thawed. Conversely, I’ve guided people through a methodical two-hour inspection and preparation that cost them nothing but time, and those docks came out of winter without a single problem.
What follows is the exact procedure I run on my own property each November, refined across two decades of Gulf Coast marine work and applied to dozens of residential installations from east Texas all the way to the Florida panhandle. Treat this as your operational reference.
Start With a Full Electrical Inspection Before You Touch Anything
My beginning move is a complete circuit of the dock, armed with a flashlight and a voltage detector that doesn’t require physical contact. I’m scanning junction boxes, receptacles, and anywhere conduit enters the structure — hunting for moisture seepage, oxidation patterns, or visible deterioration. On a typical 60-foot installation, this reconnaissance phase consumes roughly 45 minutes. Those 45 minutes represent the most valuable portion of your entire winterization effort.
The ABYC E-11 ruleset — covering both alternating and direct current electrical architecture for marine structures — mandates that all utility connections be sealed against weather and that ground fault detection circuits operate within 6 feet of any water feature. From my observation over the years, one outlet in roughly every three on a residential dock has silently failed its ground fault test. Power flows through it normally. Protection against fault conditions? Absent. That translates to serious electrocution danger, not merely a regulation missed.
This principle cost me $380 in component replacement back in 2009 when I rushed through my own dock and skipped the preliminary inspection. Come spring, I found a corroded neutral conductor inside my main distribution box that had been discharging sparks continuously through the off-season. I don’t bypass that walkthrough anymore, regardless of schedule pressure.
Conditions to Flag During Your Electrical Review
- Copper salts or aluminum oxide deposits collected on terminals, connector pins, or junction hardware
- Splits, stiffness, or degraded conduit material — particularly where conduit transitions or changes direction
- Pooling or dripping water visible in outlet chambers or protective covers
- Unresponsive GFCI protection or indicators that won’t reset (check the TEST function on all units)
- Conductor insulation not labeled for damp environments or saltwater exposure — scan labels for “W” or “WW” markings
- Utility feed cord deterioration — cracks, splits, or swollen jackets warrant immediate substitution before warm weather use
Address every flag before you move into winterization work. Concealing a problem through the off-season guarantees it surfaces worse and becomes harder to isolate when you need the dock operational again.
Executing Dock Electrical and Water System Winterization: The Complete Sequence
The inspection finished, I proceed to active winterization. Electrical and water systems get handled in tandem because their infrastructure regularly overlaps on residential installations — they travel through the same conduit channels, share junction points, and converge at shore connections. Separating them stretches the work and creates blind spots where problems hide.
Powering Down the Dock’s Electrical Plant
The opening move is pulling shore power at the pedestal itself — not merely switching off the breaker panel. Panel breakers can malfunction. Pedestal disconnection ensures zero voltage exists across the entire installation. I affix a caution tag (typically $3–$5 from any building supply outlet) to prevent anyone from restoring power during my work. That’s standard lockout/tagout safety protocol, and residential docks warrant the same rigor as commercial operations.
Next comes sealing unoccupied conduit openings and junction compartments with foam rod or silicone-sealed gaskets. Open conduit runs become highways for insects and moisture accumulation over winter. Marine-specific silicone rated for high-moisture conditions is what I use — standard caulk deteriorates rapidly in salt environments. Budget $8–$12 per cartridge; one cartridge typically covers a standard residential dock.
The final step involves applying a moisture-displacing lubricant — Boeshield T-9 is my go-to — across every terminal assembly, connector block, and exposed conductive point. The expense comes to perhaps $15 total, yet the corrosion prevention justifies ten times that outlay. In my experience, Gulf Coast docks that bypass this application develop visible oxidation across terminals within a single dormant season.
Clearing and Safeguarding Dock Water Supply Lines
Water system winterization starts by shutting the supply isolation valve where the line enters from shore. Every faucet, spray nozzle, and valve outlet on the dock gets opened to release trapped water via gravity drainage. Standard residential dock plumbing runs half or three-quarter inch PVC or polyethylene tubing — both materials will fracture if interior water freezes and expands.
Following gravity discharge, I deploy a small air compressor calibrated to 30 PSI to flush residual water from the lines. Never exceed 50 PSI on PVC connections — excessive pressure fractures aging joints before the freeze can. I run the compressor on each line segment for 15–20 seconds, then progress onward. Total time for most residential setups: under half an hour.
Bear in mind: on-board water heating equipment or circulation pumps demand separate winterization per their documentation. Two tablespoons of water sitting in a pump internals will crack the casting once the thermometer dips below freezing. I’ve had to source replacement pump casings twice due to previous owners overlooking this detail — each swap ran $180–$240 in materials alone.
Freeze Prevention Strategy: Why Your De-icer Becomes Essential Before Winter Settles In
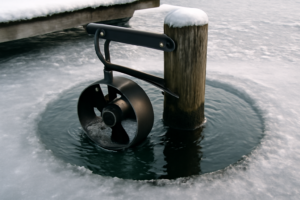
In zones where water surface temperatures drop and ice forms — or even partially freezes during severe seasons — neglecting a circulating de-icer invites serious infrastructure damage. Ice expansion against structural pilings generates compressive loads reaching many thousands of pounds per linear foot. I’ve witnessed massive steel pilings bend inward from ice pressure along the Gulf Coast. A functional de-icer maintains water circulation and prevents the ice sheet from building in the first place.
Installation and activation must occur before freezing conditions arrive. However, here’s what most owners miss: the impeller status. When the impeller becomes worn or chipped, circulation effectiveness plummets dramatically — and that degradation stays invisible until ice has already formed and harmed things. Which is why I swap my de-icer impeller every fall as part of this routine, not post-winter when the damage bill comes due.
The De-icer That Protected My Dock From Shutdown Last December
Encased in ice, a dock transforms into a dead zone where corrosion accelerates around electrical components and dampness infiltrates sealed boxes and connections. Maintaining fluid movement around your dock’s power infrastructure and plumbing entry points stands as one of the shrewdest protective decisions possible before the winter season truly takes hold.
What delivers results
- Operation noise level remains low enough for 24-hour running without disruption, yet flow volume keeps a 15-20 foot unfrozen perimeter encircling your electrical distribution hub and water entry locations
- Impeller geometry resists clogging from aquatic growth, sediment, and dock substrate debris — ongoing monitoring throughout the season stays minimal once deployed
- Replacement impellers pull out and reinstall with basic tools — a collision or debris strike doesn’t necessitate full-unit changeover in subfreezing temperatures
What falls short
- A ready receptacle on your dock — already protected through winterization — is prerequisite; the de-icer can’t perform electrical miracles if your systems are already compromised or unfunctional
- During severe cold snaps dipping to -10°F or lower, single-unit operation may prove insufficient — dual units or repositioning becomes necessary for complete ice suppression under extreme conditions
I almost pulled the trigger on a second one last year when the temperature bottomed out at -18°F and ice started creeping back in, but repositioning it closer to the electrical box gave me the coverage I needed. If you’re serious about keeping your dock’s nervous system alive through winter, grab a Scott Aerator Aquasweep & Deicer Replacement Propeller as your insurance policy.
Frequently Asked Questions
How do I winterize PVC water lines on my dock?
Shut the supply isolation valve at shore, open every faucet and outlet to drain by gravity, then use an air compressor calibrated to 30 PSI to flush residual water from each line segment for 15–20 seconds. Never exceed 50 PSI on PVC connections, and the entire process takes under half an hour for most residential setups.
Why do GFCI outlets fail on winterized residential docks?
From my observation, roughly one outlet in every three on a residential dock silently fails its ground fault test due to salt exposure and moisture seepage over winter. Power flows normally, but protection against fault conditions becomes absent, creating serious electrocution danger despite appearing functional.
What happens if I ignore dock electrical winterization one season?
I watched one property owner skip this work through a single winter—the repair bill came to $4,200 when things thawed. Corrosion starts the moment conditions turn damp and cold, and salt water finds its way into every unprotected space, accelerating oxidation and component failure.
Sources and further reading
About This Article

Written by Trent Hollis. Waterfront homeowner turned DIY obsessive. After two decades tinkering with my own dock, seawall, and boat lift on the Gulf Coast, I share everything I've learned about waterfront construction, boat lift maintenance, and coastal living projects. More about this site.
Scope and limits. Trent is a waterfront homeowner, not a licensed marine contractor. Structural, electrical, and lift work should go to a licensed marine contractor, and most in-water work needs a permit before you start.
Verify this against a primary source
Specifics change, and your situation may differ from the one described here. These are the authorities worth checking directly:
- ABYC — marine electrical and construction standards
- U.S. Army Corps of Engineers — permitting for work in navigable waters
- NOAA Tides & Currents — tidal range and water level data for your site