Most waterfront property owners believe erosion control requires heavy machinery and contractor budgets — and that misconception has cost them tens of thousands of dollars in unnecessary expenses. The truth is simpler: erosion control systems work reliably when you address the root cause — water energy — instead of just building barriers. Over twenty years installing and rebuilding failed systems along the Gulf Coast, I’ve watched homeowners equipped with wheelbarrows and basic materials stabilize ten feet or more of eroding shoreline in a weekend. The catch isn’t complexity. It’s understanding the sequence.
Good news sits right here: you genuinely don’t need barges, cranes, or five-figure contractor bills to hold most residential banks in place. I’ve observed property owners with hand tools reclaim ground that seemed permanently lost using materials that stack up in a pickup truck and a clear process. The emphasis belongs on “clear process.” Bank stabilization isn’t accomplished in one step. It operates as stacked layers, each performing a distinct function.
What follows covers the approaches I’d deploy on my own property — and have deployed repeatedly — across slopes, eroding banks, and tidal zones without bringing in heavy machinery. You’ll get specifics on what actually holds, what I’ve observed collapse, and where amateur efforts hit real boundaries. Let’s dig in.
Why Shorelines Erode (and Why Most DIY Fixes Miss the Point)
Water in motion — whether from waves, tidal surge, or surface runoff — removes soil when its force outmatches the ground’s resistance to being moved. That core principle drives everything that follows. Understanding this tells you exactly what your installation must accomplish: drain the water’s power away, strengthen the soil’s ability to resist, or orchestrate both simultaneously.
Countless failed amateur projects I’ve deconstructed over the decades relied exclusively on solid obstacles to prevent erosion. Broken concrete, stacked boulders, synthetic barriers — materials like these bounce wave power back instead of diffusing it. The water inevitably finds the margins and undersides of your installation and carves underneath. I’ve watched a 60-foot riprap installation get flanked and hollowed out in two consecutive storm cycles because nobody managed the energy dissipation challenge. The resulting repair bill tripled the initial cost.
Genuine erosion defense deploys flexible materials first — plants, biodegradable rolls, and organic layers that scatter wave force — followed by rigid structures only if required. This framework is what I’ll emphasize throughout, since it suits DIY work and doesn’t demand mechanical equipment.
Evaluate Your Bank’s Character Before Making Any Purchases
This deserves maximum emphasis: observe conditions thoroughly before opening your wallet. Position yourself on your shoreline when water reaches its maximum and minimum levels. Spot the bank’s base — that’s where erosion commonly originates. Measure the incline degree. Vegetation-based stabilization performs optimally on gradients gentler than 3:1 (three feet horizontal per one foot vertical). Move beyond that angle, and structural reinforcement becomes essential before plantings can take root.
Understand what your jurisdiction demands first. Almost everywhere on the Gulf and Atlantic coasts, any permanent installation below mean high tide requires authorization. Florida coordinates through the Department of Environmental Protection. The General Land Office manages Texas tidelands. Section 404 Clean Water Act wetland protections might govern your work depending on site characteristics. I’ve seen homeowners penalized thousands for well-meaning projects that crossed jurisdictional boundaries. A preliminary conversation with your county environmental department costs nothing and prevents expensive problems.
Document the location via images and basic dimensions. Record your problem zone’s linear distance, vertical relief, and whether retreat is concentrated (single trouble area) or spread across the full width. This documentation determines what quantities you’ll actually need. Illustration: a 50-foot bank face rising 2 feet demands entirely different material than a 200-foot gentle slope.
The Coir Wattle Approach: A Tested Foundation Strategy
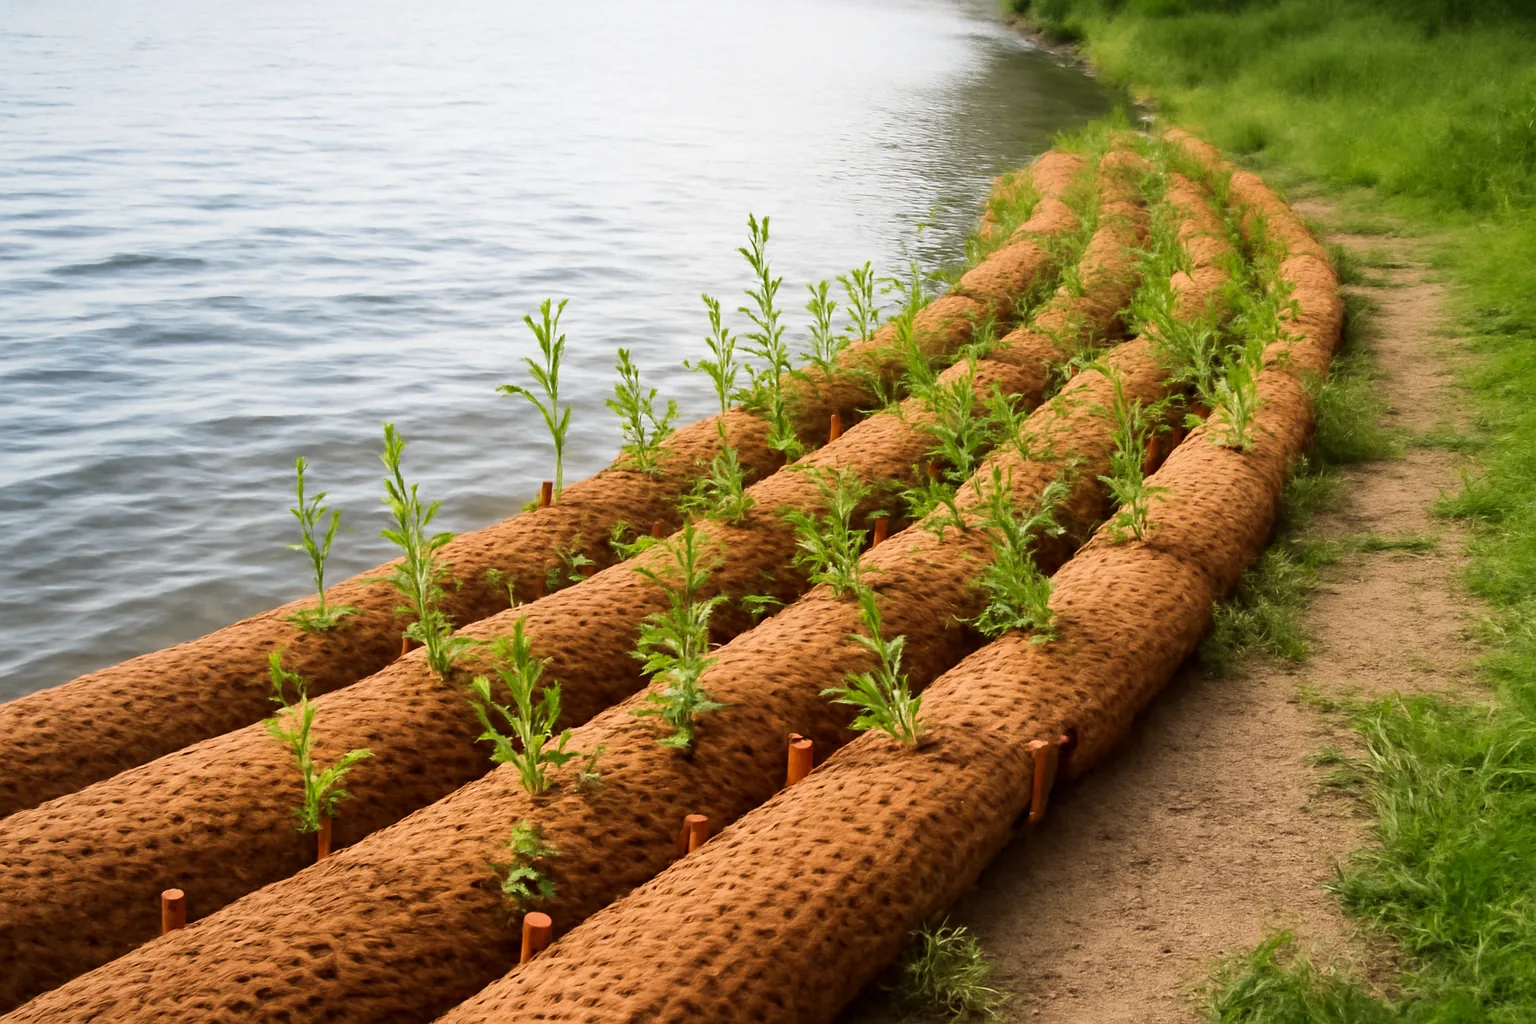
This ranks as my primary opening strategy for banks and slope toes, and execution doesn’t require mechanical assistance. Coconut fiber wattles — alternatively known as coir logs or erosion control cylinders — are tightly packed coconut material shaped into cylinders and enclosed in degradable mesh. Position them horizontally along your bank’s base and at intervals climbing the slope. These cylinders reduce water velocity, capture moving soil particles, and form shallow steps where new plant growth establishes. Through 18–24 months, the material decays as plant roots shoulder the load. It’s functional design.
The product I’ve been recommending to DIYers for the last three years is the Sandbaggy Coir Fiber Log (12″ x 5 ft, single count). I picked these up for a backyard creek bank project at my own property and was genuinely impressed by the fiber density. These are 12 inches in diameter — that’s a full-size erosion log, not a lightweight decorative roll. The 100% coconut fiber construction means they won’t leach plastic into the water as they break down, which matters a lot in tidal and freshwater environments. I’ve used cheaper fiber rolls that started shedding their synthetic netting within one season. These held their shape through two full Gulf Coast storm seasons before they began integrating into the soil.
For those tackling a longer run or working with a tighter budget per linear foot, the Sandbaggy Coir Fiber Log 2-count pack gives you 10 linear feet at a better per-unit cost. I’d use the single count to test placement and alignment on a problem section first, then order the two-pack for the rest of the run once you know your spacing works.
Positioning Coir Wattles: The Installation Framework
The placement process isn’t complicated, but the order matters significantly. This describes my actual method:
- Remove surface obstruction including fallen branches and dead plant matter from your slope surface. Preserve all living root structures — they’re holding earth you want to conserve.
- Cut a shallow channel running along the bank’s lowest point, 3–4 inches down and matching the log’s diameter. This secures the wattle and guides drainage over, not underneath, the barrier.
- Rest the wattle in its channel and anchor it every 3 feet using wooden or bamboo stakes driven at an upslope slant. Anchors need 24–36 inches of length for reliable grip in loose ground.
- Connect successive logs end-to-end following the contour, joining them with a minimum 6-inch lap and driving stakes through the connection.
- Pack and compress earth along the wattle’s uphill edge to shut down empty spaces.
- Apply seed promptly using a regional erosion control mix. Across the Gulf region, I favor coastal marsh muhly, saltmeadow cordgrass in tidal zones, or upland fescue higher on the slope.
Slopes exceeding 4 feet need a second row at mid-height, displaced horizontally from the toe row. This generates the step effect mentioned above. For a 50-foot installation, anticipate spending $200–$400 on materials, depending on row count. Two workers tackling the job usually complete it in a day.
Pairing Vegetation with Stone Protection at the Waterline
Wattles function as a temporary solution, not a permanent answer. They grant a window — and that window is exactly their purpose. The enduring answer comes from accumulated plant biomass. Deep-rooted local plants deliver the most powerful erosion defense available anywhere, and the expense barely registers against hard construction. Wattles hold your soil stable long enough for those roots to penetrate and harden the entire system. Once root networks mature, biology replaces mechanics.
Successful Gulf Coast bank planting emphasizes black needlerush (Juncus roemerianus), saltmarsh cordgrass (Spartina alterniflora) for waterline areas, and eastern baccharis (Baccharis halimifolia) on elevated banks. Freshwater creek banks thrive with river oats (Chasmanthium latifolium) and buttonbush (Cephalanthus occidentalis). Transplant container plants rather than scattering seed within the first foot-and-a-half above waterline — wave action typically destroys seeds before sprouting. Budget $1.50–$3.50 per plant from regional nurseries specializing in native stock, spacing them at 12–18 inch intervals.
Where incoming wave action strikes directly — powerboat wash, open-water wind-driven waves — anchor the base with stone facing. Broken stone pieces (riprap) ranging from 6–12 inches across, positioned at the waterline over landscape cloth, absorb wave power before it contacts your earth. Manual stone placement works fine for modest quantities — covering 50 feet with a 2-foot-wide single layer demands roughly 4–5 tons of rock and probably three workers pushing hard. Deliverable material runs $35–$65 per ton depending on your location and stone grade.
Learning From My Own Installation Failure
Personal experience on a tidal creek during 2014 gave me hard lessons. I positioned coir wattles expertly on a 60-foot bank stretch, seeded with care, and left feeling accomplished. Within six weeks, a single high-tide wake surge topped the lowest wattle and drenched the fresh seed behind it. The saturated ground slid. Roughly twenty feet of my work vanished in one event.
The culprit was my own oversight: I’d installed without temporary waterline protection during the busy boating season. Today I consistently recommend that clients lay a simple stone row at the water’s edge first — not elaborate or lasting, simply adequate to attenuate wave action while new seed matures. That temporary line would have prevented failure within 60–90 days — the critical window for seed germination. That single adjustment spared what became a complete restart.
Another earlier mistake: I’d placed wattles flat on undisturbed slope to accelerate progress. Water discovered the space underneath right after the next rainfall and flowed through, scouring the log’s foundation. What I’d saved in thirty minutes of trenching became days of reconstruction. The lesson stuck: correct installation of the base channel prevents exponentially more expensive repairs. Spend the time upfront.
Identifying Situations Requiring Professional Intervention
My commitment to DIY methodology doesn’t override honest assessment. These circumstances warrant engaging a credentialed marine builder or coastal specialist without delay:
- Visible soil removal at the base during standard tide cycles. When the waterline actively strips material during ordinary tidal movement, erosion velocity outpaces what vegetation can handle. Engineered protection must come first.
- Slope angle approaching or exceeding 2:1. Inclines this steep require professional design. Plant life and wattles lose effectiveness against hydrostatic loading on near-vertical faces.
- Banks directly adjacent to buildings or infrastructure. When shoreline instability threatens structures within 15 feet, professional evaluation is mandatory. Bank failure here creates consequences far exceeding consultation expenses.
- Regulatory entanglement involving wetlands or coastal protection zones. Sites with wetland designations, restricted waterway classifications, or coastal construction setback requirements demand licensed professional documentation. Unauthorized work penalties frequently hit $10,000+ daily in many jurisdictions.
- Erosion consuming more than 2 feet annually. That speed outpaces what amateur methods can match. Engineered solutions become economically essential.
For shallow retreat, seasonal slumping, or slope failures manageable by hand — DIY delivers excellent value. The methods outlined here are drawn directly from professional restoration jobs. Equipment and crew size represent the only distinctions.
Wrapping Up: Your Erosion Action Plan
Bank stabilization delivered through your own effort is among the highest-return waterfront investments available. Performed properly, it preserves ground, enriches ecosystem function, and eliminates the dread that accompanies storm surge. Performed carelessly, it burns funds and worsens retreat.
Start with observation. Understand your slope, your water energy sources, and your regulatory environment before you buy anything. Then work in layers: temporary energy reduction at the toe, fiber logs to hold the soil profile, and native vegetation to create the permanent biological anchor. The Sandbaggy Coir Fiber Log is the product I’d put in my own truck for this job — solid construction, fully biodegradable, and the right diameter to do actual work rather than just check a box.
I’ve spent two decades adjacent to moving water, and this remains certain: the waterline persistently advances. Confronting it directly proves futile — your actual objective involves delaying retreat while natural processes establish stabilizing root structure. That’s a winnable proposition using equipment you probably own and a commitment of several days’ labor. Act before the next significant event claims additional ground.
Frequently Asked Questions
What angle of bank slope can I stabilize with plants and wattles?
Vegetation-based stabilization performs optimally on gradients gentler than 3:1, meaning three feet horizontal per one foot vertical. Beyond that angle, structural reinforcement becomes essential before plantings can take root. Slopes approaching or exceeding 2:1 require professional design.
How deep should I cut the channel for coir wattles?
Cut a shallow channel running along the bank’s lowest point 3–4 inches down and matching the log’s diameter. This secures the wattle and guides drainage over, not underneath, the barrier. Pack and compress earth along the wattle’s uphill edge to shut down empty spaces.
How much does a 50-foot coir wattle installation cost?
For a 50-foot installation, anticipate spending $200–$400 on materials, depending on row count. Two workers tackling the job usually complete it in a day. Regional native plants run $1.50–$3.50 per plant from nurseries specializing in native stock.
When should I hire a marine contractor instead of doing it myself?
Engage a credentialed marine builder if visible soil removal occurs during standard tide cycles, slope angle exceeds 2:1, banks adjoin buildings within 15 feet, wetland regulations apply, or erosion consumes more than 2 feet annually. These circumstances warrant professional evaluation without delay.
Sources and further reading
About This Article

Written by Trent Hollis. Waterfront homeowner turned DIY obsessive. After two decades tinkering with my own dock, seawall, and boat lift on the Gulf Coast, I share everything I've learned about waterfront construction, boat lift maintenance, and coastal living projects. More about this site.
Scope and limits. Trent is a waterfront homeowner, not a licensed marine contractor. Structural, electrical, and lift work should go to a licensed marine contractor, and most in-water work needs a permit before you start.
Verify this against a primary source
Specifics change, and your situation may differ from the one described here. These are the authorities worth checking directly:
- ABYC — marine electrical and construction standards
- U.S. Army Corps of Engineers — permitting for work in navigable waters
- NOAA Tides & Currents — tidal range and water level data for your site